Happy new year 2021 from BHLLinux


2020 year was a very challenging year for us all. With all the things that have happened lately and Covid19 catastrophe that is still running all across the globe, we have eventually reach the end of 2020. Regarding the BHLLinux, my website is now running almost a year. To celebrate that event and to close this 2020 year, here are top 5 most visited article on the website. 


1. Top 10 tar examples in Linux

https://www.bhllinux.com/2020/12/10-tar-command-examples-in-linux.html


2. Top 10 sed command examples in Linux

https://www.bhllinux.com/2020/11/10-sed-command-examples-in-linux.html


3. Zorin OS 15.3 Core Review

https://www.bhllinux.com/2020/12/zorin-os-153-core-review.html


4. How to make bootable USB installation via dd in Linux?

https://www.bhllinux.com/2020/12/how-to-make-bootable-usb-via-dd-in-linux.html


5. How to permanently add directory to PATH in Linux?

https://www.bhllinux.com/2020/12/how-to-permanently-add-directory-to.html


This was from me in this final hours of 2020 year. I wish you all the best luck and wishes in the new 2021 year. Till the next time. 

Share:

How to update tar archive in Linux?


In recent article I have written on 10 useful and practical tar command examples in Linux. But, in this article I'm going to show you how you can update tar archive by adding new files to it? 


First of all let's go and make a new archive so that we can reuse the commands we learn from the tar article. We are going to make a new archive by the name bhl1.tar on Desktop. Here's the command. 


Now our archive by the name bhl1.tar has been successfully created and it contains only one file by the name logo.png. Let us update this archive and add inside it a log.txt file. Here's the command. 


Note that above command uses the -r flag to append a file or update a previously created archive. Make sure to click on the image bellow and visit previous article on 10 tar command examples in Linux. 


Our archive has been successfully updated with a file log.txt. This is it. Now you now how to append and update your previously created tar archive in Linux. Till next time. 

Share:

10 Tar command examples in Linux


The tar command stands for tape archive and it is used for backup purpose. It is very useful command that one need to know when it comes to personal data and so on. In this article, check out this 10 very useful and practical tar command examples.


1. Create a tar archive

In this example, we are going to create tar archive. Here's the command. 


Once this command is executed, it will create bhlarchive.tar file. 


In above example we have:

  • c which will create a new tar archive
  • v verbose (show me what you are doing)
  • f archive tape

2. Show content of tar archive

If we want to show the content of tar archive without extracting it, we can use the following command. 


As we can see on the above image, the output of previously created archive has been shown in terminal. That lover t in the above command is used to show the archive content. 

3. Untar the tar archive

In case we want to extract the previously created archive, we can use the following command. 


As we see, the command has extracted all the content of bhlarchive.tar into the BHL_ARCHIVE directory which is located on Desktop. Note: The -x will extract the archive while -C is used to specify destination directory in which we are extraction the archive. 

4. Create tar.gz archive

In order to create gzip archive, we can use the following command.


In the above command, we have use -z flag to make a gzip archive file. 

5. Create tar.bz2 archive

The bz2 feature compress and create archive file less than the size of gzip. In order to make a bz2 archive, we can use the following command. 


In the above command -j flag represents the bz2 archive file. 

6. Show the content of tar.bz2 archive

In order to show the content of tar.bz2 archive, we can use the following command.


7. Uncompress tar.bz2 archive

In order to uncompress the content of tar.bz2 archive, we can use the following command. 


In above command I have used -C flag to extract the content of bhlarchive.tar.bz2 into myBZ2archive directory. 

8. Show the content of tar.gz archive

In order to show the content of tar.gz archive, we can use the following command.


9. Extract tar.gz archive 

In order to extract the content of the tar.gz archive, we can use the following command.


In above command, once again I have used -C flag to extract the content of the bhlarchive.tar.gz archive into myGZarchive directory.

10. Untar single file from tar archive

In order to untar single file from tar archive, we can use the following command.


In above example, I have used -C flag to extract only '7.png' file from bhlarchive.tar into a /tmp/data directory. 

Conclusion

Working with tar is very useful and once you master it, you can use it to make a backup of your files and prevent data loss or damage. In this article, I have successfully shown you how to make a tar archive, how to view it's content, how to extract it. This article has also shown how to make tar.gz, tar.bz archive and how to extract a full archive into specific directory or untar single file into desired directory. If you like this article, make sure to share it, leave a comment down bellow in case you have notice any technical error in this article. I see you next time.

Share:

How to change current host name in Linux?


Host name is simply your computer's name that is usually set upon installation of Linux distribution. Maybe for some reason, you want to change that name. If that is so, in this article I'm going to show you how?


Determine current host name!

Due to fact that modern Linux distributions uses Systemd, there is a tool or command known as hostnamectl. Once run in terminal it will show the current host name of your machine. Here's the command.

# hostnamectl 


As we can see, the name of my machine is 'ubuntustation' and I want to change this name into 'bhl'. Here's the command that will accomplish such task. 

Change current host name

The command that will change the current host name is the following.

# hostnamectl  set-hostname bhl

Once executed, the host name should be changed from 'ubuntustation' into 'bhl'. If we run the hostnamectl command once more, we should seen a new host name of the machine. 


There we go. The host name has been successfully changed from 'ubuntustation' into 'bhl'. I hopped that you have successfully changed your own host name as well.

Conclusion

Hostnamectl is a very simple command that allows you to change your current host name into new name of your machine. In case that you need to change name which you have set upon installation process, now you know how to change it. If you like this article, make sure to share it, like it, comment it down bellow and till the next time. 

Share:

Zorin OS 15.3 Core review


Zorin OS is one very amazing Linux distribution available. It is packed with lots of features, applications for daily use and others things as well. Most notable, this a Linux distribution for those who are willing to begin their journey into the Linux world. In this article, check out this brief Zorin OS 15.3 Core review. 


As I noted in brier introduction of this article, Zorin OS is a very amazing Linux distribution but also is a distribution that has come a very long way in it's development. Before we dive into a review of Zorin 15.3 Core which runs my laptop, let us jump on  to it's website. Once you visit official Zorin website, there are four editions of Zorin which are available for download. They are Ultimate, Core, Lite and Education. 


Note that Ultimate edition of Zorin, which is bundled with tons of apps and other useful packages is not cheap and it cost around 39 Euros. Therefore I have downloaded Zorin OS Core edition and using dd command, created a bootable Zorin OS installation. Check out the full article down bellow in order to make your own bootable USB installation using dd command.


Once I have made installation, I've also moved all my data on to my backup  hard drive which is around 500GB strong. Previously, my HP Pavilion DV6 laptop was run by Linux Mint 20 Ulyana and distribution it self runs very smoothly. But, since I'm that kind of Linux user who changes Linux distribution every so often, Zorin OS was a good choice. 


Zorin OS Requirement 


Zorin OS is a modern Linux distribution and as such, there are some hardware requirements that your computer or laptop need to meat in order to experience a full power of this Linux distribution. Those requirement are as follow.


I would also suggest at least Intel i3 processor, 4GB RAM and SSD 120/240 GB for the optimal results. As far as my laptop, these are it's specs.


I should note that my laptop has 240 GB fast SSD drive and 500 GB HDD for storage purpose. Also, there are two GPU that runs my machine Intel HD 3000 able to perform up to 6 GB and AMD Radeon 750 HD graphics able to perform up to 3 GB of video RAM. 


Short guide on Zorin OS installation


Since I'm writing this review from a fully installed Zorin OS 15.3 Core, I'm going to give you a short guide on installation scheme that I have done. Basically, you can install Zorin OS alongside your Windows OS, but if you have decided to move on to Zorin entirely, than you will have to choice something else. 


This dialog will allow you to create custom partitions for your Zorin OS such as the root (/), swap, and home. Since I always install every new Linux distribution using something else dialog, these are three partitions that I have created. Since I'm running 240 GB SSD, I have created following partitions:

  • Root (/) - 78 GB 
  • Swap partition is around 8GB
  • The /home partition is 134 GB


These are three partitions that I'm usually installing when it comes to every new Linux distribution. It is also recommended that you make a boot partition which should be around 1GB, but I'm not installing it. 


Once you create partitions such as (/),swap, /home, and boot as in case of above image, all you need is to click install now which will create and format these partitions; afterwards you will need to fill out your username, host name, password and you're good to go.


The final step that is left is to click Continue which will start installation of Zorin it self. 

Zorin OS Tour 

Once the installation of Zorin is completed, you will be greeted with it's dialog which asks you to enter your passwd in order to login. Once you do that, you will see empty Zorin desktop with the default background. 

As you can see, I have made my own Zorin background and it looks nice. Anyway, it is important to note that this edition of Zorin Core is based on Ubuntu 18.4.02 LTS which brings a improved security and privacy features, Linux kernel 5.4.0-58, GNOME desktop environment, Zorin custom themes and icons. 

As far as applications, they are separated in categories but, there are no to much applications preinstalled. Once you click Zorin bottom icon, a menu will pop up with applications that you can select.

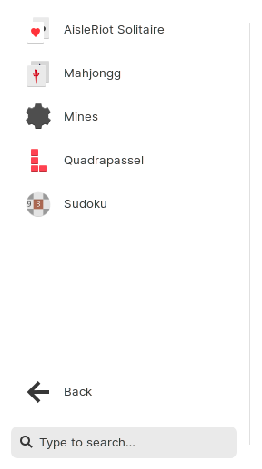
As I noted, not many applications are preinstalled so by default, Zorin 15.3 comes with Firefox web browser, GParted partition tool, LibreOffice, Pitivi video editor, GIMP open source graphic, Remmina remote program, Shootwel, Zorin Connect program and etc. There are also some games included in Zorin 15.3 Core and they are as follow.


 Note that all other applications can be installed from Zorin Software Center which look like this.


Application installation from Zorin Software center is easy and it takes three click most, and application will be availabe. Also, Zorin comes with several GTK and icon themes that you can select in order to make your desktop space better. 

Inside appearance dialog, you can select several GTK and icons themes for your Zorin OS. 

Conclusion

Zorin OS Core is one very unique, easy to use and friendly Linux distribution. For it's work, it requires optimal system requirement, it has very simple way of installing new softwares, is is bundled with all essential applications that every Linux beginner might need. Therefore, Zorin OS Core is ideal Linux distribution for new Linux comers that are seeking distribution that will help them dive into Linux more seriously and on the way try to learn the Linux way of things and eventually switching from Windows on to Linux.
Share:

How to make bootable USB via dd in Linux?


Recently I came up to a dd command in my Udemy Linux LPIC-1 course. It's a very useful command which you can use to make a full back-up of your partition, copy data, partitions and much more. But, in this article I'm going to show you practical side of dd command and how you can use it to make a bootable USB installation of your favorite Linux distro?


1. Make sure that your USB drive is formated

First thing that you need is to prepare your USB drive. It should be formatted in order to put a Linux distribution on it. First off all, plug in your USB drive and type the following command. 

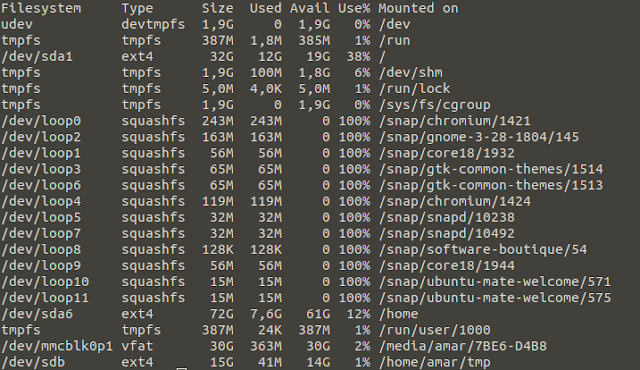
# df  -hT


This command will list all your devices on the system. Note at the bottom, there is /dev/sdb which is USB drive mounted at /home/amar/tmp. We need to unmount it using the following command. 

# sudo umount /dev/sdb 

Once this command is issued on the terminal, the USB device will be unplugged. Our next step is to format it in order to place Linux distribution to it. We can use the following command to accomplish the task. 

# sudo  mkfs.ext4  /dev/sdb


Now, we need to jump into download directory in order to find our Linux .iso. 


I have downloaded recently a Zorin OS 15.3.Core 64.bit.iso that I'm going to install on USB. It'a great OS and a full review is also coming at this website. Now, let's write the Zorin OS to the usb drive. Here's the command. 

# dd bs=4M if=Zorin-OS-15.3-Core-64-bit.iso of=/dev/sdb status=progress oflag=sync


The write up process of Zorin OS has been successfully started and dd command now writes the Zorins OS on to a /dev/sdb drive. While dd commands write the Zorin to my drive, here's the quick note on how dd command works.

In order to work properly with dd command, we need to pass the input file or if, in our case it's a Zorin OS.iso which is input file or a source from where wee want to copy our Linux distribution; and last is output file or of, which in our case is the /dev/sdb drive on which we are copying the Zorin OS distribtution. In the above command, the bs flag means 'bytes per second' or write speed which is set to 4 MB. 

The status progress flag is simply to tell dd command to display the copying progress in terminal. 


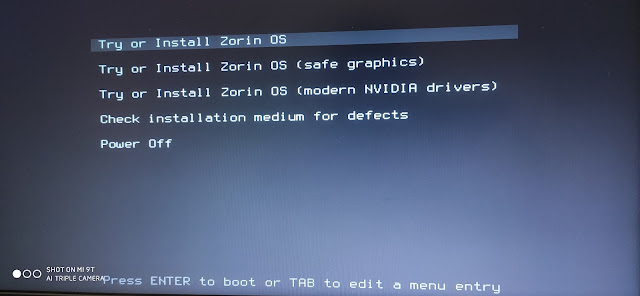
Our Zorin OS is successfully copied on to USB drive. The final thing left for this article is to boot the USB drive to make sure that Zorin OS will boot. Let's see.


If you see such a screen as on above image, it means that dd command has successfully completed operation and that Zorin OS is now bootable. 

There you go. Now you can plug in your USB drive, test your distribution of choice, try it out, install it from your USB drive. So, in this article you have learned how to unmount USB drive, how to format it via terminal and how to make it bootable using dd command. If you like this article, please share and I see you next time. 

Share:

KURS LINUX ESSENTIALS

KURS LINUX ESSENTIALS

PRIRUČNIK - ZORIN OS & PRVI KORACI SA LINUXOM

POPULARNI POSTOVI

NAJNOVIJE